
Whats is WebVR?
WebVR is a JavaScript API for creating immersive 3D, virtual reality experiences in your browser. WebVR was originally conceived at Mozilla by [Vladimir Vukicvic].
Whats is WebGl?
Webgl is a javascript API, for rendering 2D and 3D graphics on web browser without a need of additional plugins. Can be used inside of HTML elements like canvas.
Whats is A-frame?
It is web framework for building virtual reality experiences. The tools is supported by Mozilla Teams, and works on Vive, Rift, Daydream, GearVR and desktop.
A frame uses a WebVr API to get access to data provided by virtual reality headset about orientation and position, transforming the camera and rendering the content to the Headset.
A-Frame is based on HTML, making it easy to getting started with. It uses the concept of components providing good structure on it. According to the site, A-Frame is compatible with most libraries, frameworks, and tools including React, Preact, Vue.js, d3.js, Ember.js, jQuery. For more information about A-Frame, you can find here.
Pre-requesites
For getting started with WebVr using A-frame we need:
- Some basic understanding of HTML
- Text code editor, I am using a visual code studio, but it is up to you.
- A web browser, I use a Mozilla Firefox browser, it works well for me, I got some troubles using chrome may be because it was not in the last version. But it is supported by those browser witches supports WebGL.
- A virtual Reality Headsets, this is optional, and don’t worry about if you don’t have it yet, it still works well on a desktop and smartphone.
First steps
we will open our editor code and start a new HTML file, we will call hellovr.html. Then we will include a script pointing a CDN of A-frame.
Our A-frame code will be placed inside our body tags. On this tutorial we will focus on basic concept and building a simple applications. After that you can build your own wonderful staff.
Inside our body tag lets place tag like this, and open our HTML on the browser.
< a-scene > < / a-scene >
< a-scene > is a primitive tags, and all our A-frame components will be placed inside this tags. Make sure you don’t forget to close the tags. After Loading the browser will be displayed a blank page with a VR icon on bottom right of the page like the image bellow.

If you got a different result, open the console of your web browser to see if there is an error. This icon enable you to get fully immersed on VR experience with a headset.
Now lets put something on our VR applications.
A-frame is completely based on Three.js. The Mozilla Team wanted to build something simple for WebVR development, that’s why they used HTML syntax, making it easy for beginners.
Some of this syntax are called primitive. Example: < a-box > and < a-sky >.
To use primitive on our Webvr, we put a < a-box > tag inside our < a-scene >, tag like the code bellow.
< a-box
height=”1″
width=”2″
depth=”3″
position=”0 0 -4″
color=”blue”
< / a-box >
Let’s understand what’s going on here:
< a-box > will draw a box on our HTML page. It takes some parameter like:
- height, how tall will be our box (x);
- width (y)
- depth, gives a 3D perspective (z);
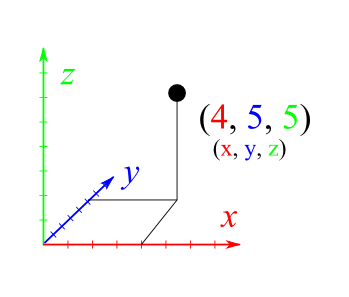
- position, to set where we want to place our element. We pass as a parameter three value(x,y,z). The image below shows us how to position a point in 3D environment.
- color, we can specify our box color in hexadecimal (e.i: #fff).
There is more attributes, witch value are set to default, please check the documentations for more information.
Now lets open our browser to see the result.

Congratulation, we build our first VR experience. You can use the keyboard controls and mouse to interact with our VR environment. Now lets move on.
Now we are going to add more staff on our project.

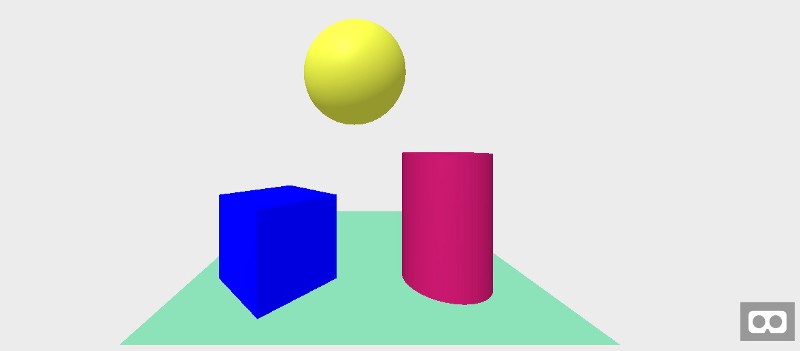
The new feature we added are:
- < a-sphere> take as a parameter a radius
- < a-cylinder> take as a radius and height
- < a-plane> take as a width and height and rotations of -90 deg x, to make it horizontal plane.
- < a-sky> take as parameters color, which will effect all our VR environment
and we changed our < a-box> attributes as height, width and depth.
Now we a going to make our hello world in our application as we do traditional when we get started with a new language programming.
We will use < a-text> tag, like the code bellow:
< a-text value=”Hello, World!” color=”#AA145D” position=”0 2 -3 >
< / a-text>
In our < a-text> tag, we pass the value which contains a text, a position and color. And the Result is:

Content and all the images belong to medium.com
[…] Link: https://helpdev.eu/building-a-webvr-application-using-a-frame/ […]